How to Make Challenge Coins?
When you want to make your own coins, you don’t need to be a designer or a metal expert to get a professional coin—you just need to know the right steps and what decisions matter.
In this guide, I’ll walk you through the complete journey from idea to finished coin: how to design it, how your concept becomes production-ready artwork, and how to place an order with a manufacturer.
1. Decide Why You’re Making a Challenge Coin
Before you dive into the price/ how to order. You need to identify: Who will receive the coins? The audience affects the overall tone of the coin.
- Military units
- Police, fire, and EMS departments
- Companies and brands
- Schools and clubs
- Events and commemorations
Once you’re clear about the purpose and the recipients, you’ll have a much easier time making design choices in the next step.

2. Design the Look of Your Coin
Now, let’s come to the coin design. In this part, I will share all my experiences of 15 years making coins with you. I believe, by the end, you are able to draft your own coins.
Step 1: Choose Size, Shape
The size and shape of your challenge coin determine how it looks and how much detail you can include in the design.
Most challenge coins are made in standard sizes between 1.5 and 2 inches, which offer a good balance between detail, weight, and cost. In our production, I see many military coins and corporate coins are 2.25”, 2.5”, and more.
About Shape. While round coins are the most common, many military organizations choose custom shapes to reflect their identity. Shield outlines, dog tag shapes, and equipment silhouettes are popular for military, first responder, and specialized units.
We produce custom shapes based on your requirements.
Next, about plating colors. Challenge coins are typically made from zinc alloy, brass and Iron, then plated. Common finishes include gold, silver, copper, black nickel, antique brass, and dual plating combinations.
Based on our past production orders, gold and silver finishes are by far the most popular choices for challenge coins.
Step 2: Add Your Core Design Elements
In this part, I want to teach you how to define the core elements of your challenge coin. These details make the coin meaningful. Most challenge coins include some or all of the following:
- Unit emblem or logo
- Organization or unit name
- Motto, slogan, or call sign
- Date and location
- National flags or industry-related symbols
A common approach is to divide the design between the front and back of the coin. One side usually focuses on identity—such as the unit emblem, name, or logo—while the other side highlights the mission, event, achievement, or core values behind the coin. This layout keeps the design clear and prevents important details from feeling crowded.
Tip for you:
We work with many customers about custom coin designs every day, helping them turn ideas into finished coins. From these conversations, I’ve learned a few key things that come up again and again. I’m sharing them here so you can avoid unnecessary back-and-forth and save yourself a lot of time. Here are several tips for you:
- Less is more. Making your coin design with a simple design, so the important elements will be prominent, the final product will convey your meaning clearly. Do not make it with too many colors, or details, with a limited space, you see that many small texts are NOT legible to read.
- We do custom designs and shapes. You can have your coins in any shape.
Main factors that affect pricing: Size, design, quantity, and plating colors. - If you have a tight budget, choose the standard size 1.75” witha 2D design on both sides.
As long as the key elements and their intended placement are clear, the artwork can be refined during the proofing process.
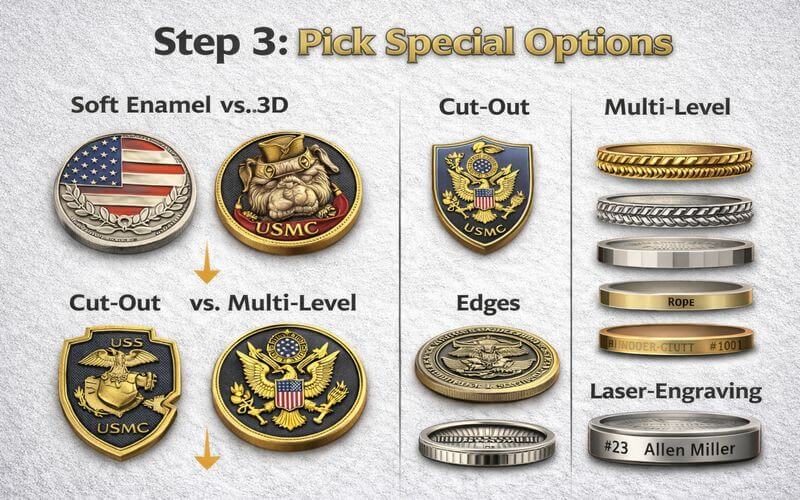
Step 3:Pick Special Options
Special options are where many designs either stand out—or accidentally become overcomplicated. The key is always the same: pick options that support your design, not ones that compete with it.
One of the most common decisions is enamel type. Soft enamel leaves the metal lines raised with recessed color areas. It has more texture and is the most popular choice for classic challenge coins. We seldom make hard enamel coins.
2D or 3D design 2D design are small raised and recessed, while 3D design comes with prominent raised elements . This works especially well for mascots, insignias, or symbolic figures.
Cut-out designs remove metal entirely in certain areas, while multi-level construction adds different height layers to create stronger visual contrast.
About the edge of the coin. Edge styles like rope edges, diamond-cut edges, flat edges, or text edges may seem like small details, but they significantly affect how the coin feels in hand.
For military coins or limited-edition designs, you can also choose laser-engraved serial numbers, individual names, ranks, or titles to add a personal touch.
Based on our experience, simpler designs with one or two distinctive features almost always appear more visually appealing than those that attempt to incorporate everything. A well-chosen option will highlight your coin’s message and make it feel intentional—not crowded.
3. Turn Your Idea Into Production Artwork
At this stage, you don’t need a perfect design file. A rough sketch, logo, written description, or reference image is more than enough to get started. This is where the manufacturer’s design team steps in to turn your idea into production-ready artwork.
From Sketch to Proof
Once your materials are received, the factory’s designers turn your idea into professional digital proof that shows precisely how the finished coin will look.
This is the most important checkpoint in the entire process, so take time to review it carefully, including:
- Text spelling and layout
- Logo placement and proportions
- Colors, finishes, and special options
Only after you approve the proof, the factory moves forward to mold making. Once the mold is created, making changes becomes difficult and costly, so it’s essential to confirm every detail before giving final approval.

4. How Challenge Coins Are Made?
Once the design proof is approved, production begins. From this point on, the factory takes care of everything. Let me briefly introduce the process.
Step 1 – Making the Mold
Production starts with creating the mold. Using CAD/CAM software and CNC machines, the coin design is engraved in reverse into hardened steel. Test strikes are made to check fine details and depth.
After testing, the mold goes through heat treatment, including tempering and hardening, so it can withstand the high pressure used during metal striking without wearing out.
Step 2 – Die Striking / Die Casting and Cutting
Next, the coin shape is formed. For die-struck coins, high-tonnage presses stamp the design into brass or steel blanks, creating raised and recessed details. For cast coins, molten metal is poured into molds to form the shape.
Round coins are cut using circular punches, while custom or irregular shapes are cut with specialized cutting dies to match the exact outline of the design.
Step 3 – Deburring and Polishing
After cutting, the coins go through edge trimming and deburring to remove sharp edges. This is done using tumblers, polishing machines, or manual finishing, depending on the design.
Polishing smooths the surface and prepares the coin for plating and color filling, ensuring a clean and even finish.
Step 4 – Plating
The coins are then electroplated to achieve the desired metal finish. Common options include imitation gold, imitation silver, copper, and black nickel. The plating not only defines the coin’s appearance but also adds durability and corrosion resistance.
Step 5 – Color Filling
If the design includes color, enamel is applied next. For soft enamel, the coin is plated first, and then the color is filled into the recessed areas. For hard enamel, color is filled and polished smooth before final plating, creating a flat, refined surface.
Each color layer is carefully applied and cured to ensure consistency.
Step 6 – Finishing Touches and Quality Check
Additional details such as laser engraving, serial numbers, or individual names are added if required. Every coin then goes through a quality inspection to check plating, color accuracy, and overall appearance. Any defective pieces are removed.
After inspection, the coins are cleaned, counted, and packaged.
Step 7 – Arrange Shipment
Once packaging is complete, the order is prepared for shipment and delivered according to the agreed timeline.
5. How to Order Challenge Coins?
Once you understand the design and production process, ordering challenge coins is actually quite straightforward.
Step 1: Send inquiry. When contacting a manufacturer, be ready to share:
- Quantity
- Size and shape
- Metal and plating finish
- Color and special options
- Required delivery date
Step 2: Approve artwork
Step 3: Factory arrange production & Shipment.
Production typically takes 2 to 6 weeks, depending on the coin’s complexity and quantity. Some manufacturers may offer rush options if you’re working with a tight deadline.
6. DIY vs Working With a Professional Coin Maker
DIY methods like 3D printing or basic metalwork work for very small quantities or simple prototypes. They’re mainly suited for personal projects.
For official use, most organizations work with a professional manufacturer. Military, government, companies, schools, and large events need consistent quality, accurate details, and reliable production at scale—something DIY methods can’t provide.
After you read the article, you’ll understand what happens at each stage, avoid common mistakes, and order challenge coins that look sharp, feel solid, and arrive on time.
